
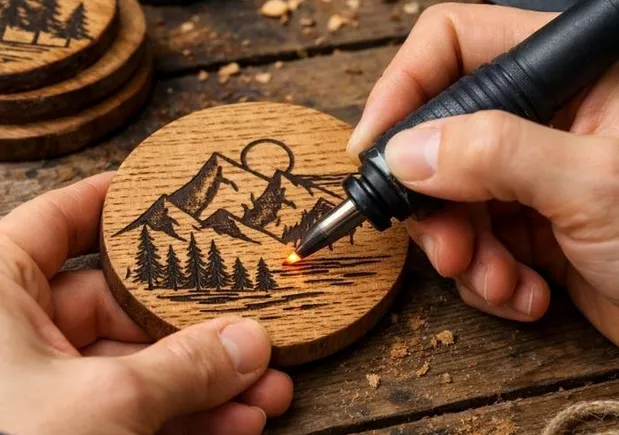
There’s something deeply satisfying about turning a plain wooden object into something personal and beautiful. Wooden coasters are one of those everyday items that sit quietly on coffee tables, rarely getting a second glance. But hand someone a coaster engraved with their initials, a meaningful date, or a design they love, and suddenly it becomes a keepsake.
The good news is that creating these kinds of personalized pieces doesn’t require years of craft experience or expensive equipment. With a basic engraving kit and a little patience, anyone can transform a humble wooden coaster into something genuinely worth keeping.
Getting Started: What You Need Before You Begin
Before you pick up an engraving pen, it helps to gather a few simple supplies. Blank wooden coasters are widely available at craft stores and online, and they come in a range of wood types. Lighter woods like basswood and pine are ideal for beginners because they’re softer and easier to engrave. You’ll also want a pencil for sketching your design beforehand, some fine-grit sandpaper to smooth the surface, and a cloth to wipe away any dust.
The engraving tool itself is the centerpiece of your setup. A corded or battery-powered engraving pen works well for coaster projects, giving you enough control to trace fine lines and detailed patterns without the tool feeling unwieldy in your hand. If you’re new to this craft, starting with a lower speed setting lets you get comfortable with how the tip moves across the wood before committing to deeper marks.
Choose the Right Kit for Wood Engraving
Not all engraving tools are created equal, and the difference between a frustrating first attempt and a satisfying one often comes down to the quality of your kit. For coaster projects specifically, you want a tool with variable speed control, a comfortable grip, and tips designed for detailed work on softer materials.
This is where purpose-built kits for engraving wood really stand out compared to generic multi-tool sets. A dedicated wood engraving kit includes tips sized and shaped for the kinds of lines and textures that make wooden pieces look polished rather than scratched. Resparked offers a beginner-friendly engraving pen used by more than 650,000 people. The brand holds an “Excellent” rating based on nearly 2,500 customer reviews, reflecting how well it works for people picking up this hobby for the first time.
Having the right kit removes a lot of the guesswork and lets you focus on the creative part.
Designing Your Coaster: Simple Ideas That Look Impressive
One of the best things about coaster engraving is that simple designs often look the most striking. You don’t need to be an illustrator to create something beautiful. Here are a few design approaches that work well on wood:
- Monograms and Initials: A single letter centered on the coaster, done in a clean font or a flowing script, looks elegant and personal. These make wonderful housewarming or wedding gifts.
- Botanical Outlines: Leaves, ferns, and simple floral shapes translate beautifully into engraved lines. Trace a reference image lightly in pencil first, then follow the outline with your engraving pen.
- Geometric Patterns: Repeating shapes like triangles, hexagons, or concentric circles are forgiving for beginners because they rely on straight lines and consistent spacing rather than freehand curves.
- Coordinates or Short Phrases: Engraving a meaningful location or a short word adds a personal touch without requiring advanced drawing skills.
Sketch your design lightly in pencil before you engrave. If you make a mistake during the sketch phase, it’s easy to sand it away. Once the engraving pen touches the wood, those marks are permanent, so the pencil stage is your safety net.
Technique Tips for Cleaner Lines and Better Results
Holding the engraving pen like a pencil, at roughly a 45-degree angle, gives you the most control. Move the tool slowly and steadily, letting the tip do the work rather than pressing hard. Pressing too firmly can gouge the wood unevenly, while moving too quickly produces faint, scratchy lines.
Work in short strokes rather than trying to drag the tip across a long line in one pass. Overlapping short strokes creates smoother, more consistent lines once you step back and look at the full design. For shading or texture, try cross-hatching or stippling with the tip to build up depth in specific areas.
If your lines feel choppy, practice on a scrap piece of wood first. Even five minutes of practice strokes on a spare coaster will noticeably improve your control before you move to the finished piece.
Finishing Your Coaster So It Actually Lasts
Once you’ve finished engraving, gently brush away any wood dust with a soft cloth. At this point, your coaster looks great, but it’s still raw wood, which means it can absorb moisture and warp over time if left unsealed.
Applying a thin coat of food-safe wood finish or clear sealant protects the surface and makes the engraved lines pop visually. Matte finishes give a natural, handcrafted look, while satin or gloss finishes add a little sheen. Apply the finish with a small brush, let it dry fully, and add a second coat if needed.
For the base, self-adhesive cork pads cut to size prevent the coaster from scratching surfaces and add a professional finishing touch that makes homemade pieces look genuinely store-bought.
How to Turn Coasters Into Gifts People Actually Love
Personalized engraved coasters have become one of the most popular handmade gift options precisely because they’re practical and meaningful at the same time. A set of four coasters engraved with someone’s family name, favorite quote, or a design that reflects their personality shows a level of thoughtfulness that a generic gift simply can’t match.
Resparked’s engraving pen makes it realistic to produce a full set of coasters in an afternoon, even as a complete beginner. The learning curve is gentle, and the results are impressive enough to give one confidence.
Coasters also pair beautifully with other personalized items. Consider bundling them with a matching engraved wooden tray or a set of linen napkins for a cohesive gift that looks like it was sourced from a boutique shop rather than assembled at a craft table.
A Craft Worth Starting Today
Wooden coaster engraving is one of those hobbies that rewards you almost immediately. The projects are small enough to finish in a single sitting, the materials are affordable, and the results are genuinely beautiful. Whether you’re making something for yourself or crafting a set of gifts for people you care about, the process is as enjoyable as the finished product. Start with one coaster, one simple design, and see where the creative instinct takes you from there.
This is a guest post.